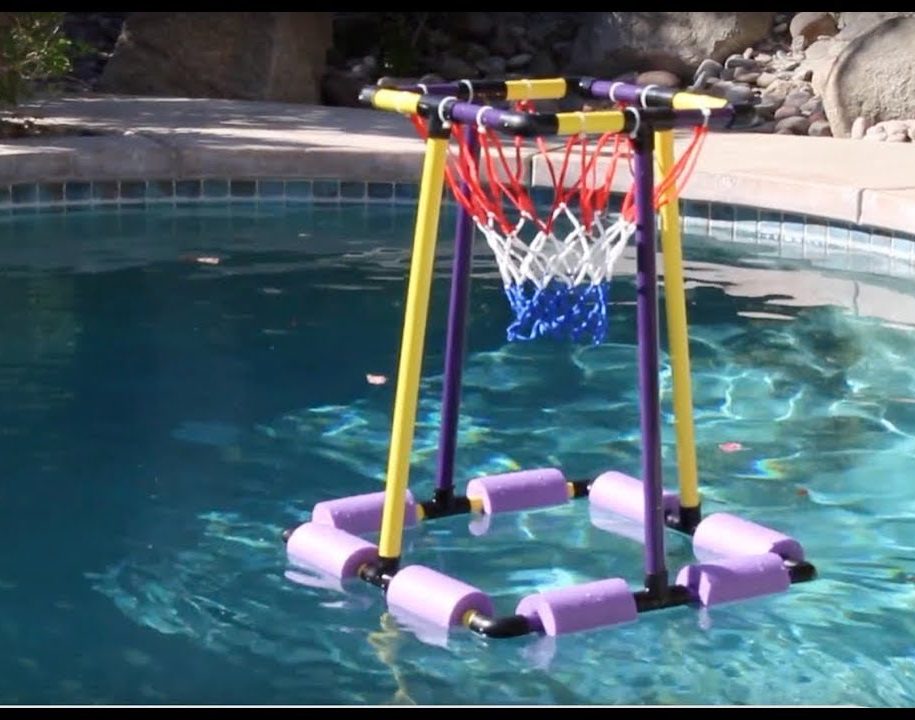
Basketball is a sport that can be played almost anywhere, provided that the appropriate conditions are met. One of these locations is high above the bodies of dye-floating basketball hoops water.
These are locations that are immediately next to various bodies of water. It is necessary to modify a standard basketball so that it may be played in these kinds of environments.
Despite the fact that repairing basketballs in such locations requires a great deal of experience, it does not have to be that way in every case. If you want to read a review of floating basketball hoops, then you must read the best floating basketball hoop review.
You can do it independently without acquiring a great deal of knowledge if you want to do so. Help is at hand for you in the form of this how-to guide on dye floating basketball hoops.
How to Dye Floating Basketball Hoops?
Tools and Materials Required
The following materials and tools will be necessary before you begin:
- 10 feet of material with a 3/4-inch PVC thickness
- 7 feet of material with a 1/2-inch PVC thickness (8x), 3/4-inch elbow with a 90-degree angle (8x) T-joint measuring 34 inches by 34 inches by 12 inches
- PVC cement
- Basketball net
- 1 or 2 pool noodles
- Zip ties
- Miter saw with a Ball Box
- Tape measure
- Sharpie
- Paint that is resistant to water when sprayed.
- Sandpaper \sHacksaw
Step-by-Step Procedures
The mentioned below steps will explain how to Dye floating basketball hoops:
Step I: Prep the Working Area
After you have gathered all the required components, the next step is to organize the working space. Putting in place procedures and plans that are geared at making the assembly of the hoop easier to do in its entirety is what this refers to.
To begin, create a perimeter around the work area to keep trespassers away, who may potentially sustain injuries themselves. Make a perimeter with the yellow ribbon around the area where you wish to do business.
The next step is, if it is at all practicable, to put up signs that state things like “Works in Progress,” “Out of Bounds,” “Keep Off,” and so on. If the place where you want to operate does not have enough illumination, you should be sure to provide additional lighting.
The same holds about the amount and degree of ventilation inside. You certainly do not want to suffocate and put yourself in danger by exposing yourself to the hazards associated with insufficient ventilation, do you?
Last but not least, be sure that there are no young children in the area since they pose the biggest threat of injury and other problems.
Step II: Put on the necessary Protective Gears
Make a move right now to safeguard yourself from potential harm. While carrying out the installation procedures, you will almost certainly end up suffering from several different sorts of injuries.
These include sharp prickles that get stuck in your eyes and other sensitive places of your body. You will need to put on a good deal of protective gear to keep them safe.
In addition to all these things, you also need to make sure that you move slowly and carefully while placing the components where they should be.
Keep in mind that the quicker you work and more carelessly you do so, the greater the likelihood you may harm your body and get some injuries.
Step III: Cut the PVC and the Noddle
Now is the time to get down to the meat and potatoes of installing these dye-floating basketball hoops. First, cut the noodle and the PVC pipe into manageable lengths. The specific measurements of the cut will, to a considerable extent, be determined by the size of the hoop you are aiming towards.
If you don’t have a choice, we strongly suggest you use the standard measures instead. These consist of the eight portions of the PVC pipes with a diameter of three-quarters of an inch. Cut these pipes to lengths of six inches for the top and eight inches for the bottom.
The top pipe should measure six inches. You must adjust these parameters to come as close as possible to the exact proportions of the basketball you want to shoot.
Always do any cutting using the box mitre saw for the best results. After that, sand the burrs at the ends of the pipes to get a solution that is both smoother and safer in the long run.
To bring this process of cutting the pipes to a satisfactory conclusion, take one pipe with a diameter of half an inch and cut it into four portions, each 20 inches long.
You are going to utilize them to support the ball as you play. One more time, keep in mind that you are free to alter and modify these measures in accordance with the particular requirements and preferences that you are considering.
Therefore, utilize the measurements we have provided as a starting point for your creativity rather than as a requirement.
Step IV: Spray Paint the Pipes
Although painting the pipes with spray paint is not required, it is strongly recommended that you do it since it will give the pipes a more aesthetically pleasing look and feel.
Please be aware that paint does not attach to the surfaces of the pipes well since the surfaces of the PVC materials are smoother, while paint needs some roughness to stick. Thank you for your understanding in this matter.
You should apply many coats of the same paint to get the best effects. In addition to this, pay particular attention to the specific sort of paint that you use.
None of the options you choose at random may provide the results you so desperately seek. The one you end up getting your hands on should be very sticky and have a long shelf life.
Step V: Kickstart the Assembly Process
You are now in a position to begin the process of putting the assembly together. Simply said, this is putting all of the separate elements and pieces of the structure you’re building together to form a single, cohesive unit.
After sliding the individual portions of the noodles over the pipe with a diameter of 3/4 inches, you should position them on the longer parts measuring 8 inches.
If they do not fit together as easily as possible, you will need to wait until the subsequent stage before doing the full activity again. Before moving on to the next level, you must do integrity checks on the system at each stage to ensure that it is, in fact, rock solid.
You may need to restart the whole activity to ensure everything is done correctly.
Step VI: Fine-tune the Assembly Process
You are now in a position to begin the process of putting the assembly together. This is putting all of the separate elements and pieces of the structure you’re building together to form a cohesive unit.
After sliding the individual portions of the noodles over the pipe with a diameter of 3/4 inches, you should position them on the longer parts measuring 8 inches. If they do not fit together as easily as possible, you will need to wait until the subsequent stage before doing the full activity again.
Before moving on to the next level, you must do integrity checks on the system at each stage to ensure that it is, in fact, rock solid. You may need to restart the whole activity to ensure everything is done correctly.
Step VII: Cement the PVC Materials together
After you have assembled the components and joints, the next step is to cement them together securely. Putty or some other kind of glue should be used to cement the foundation and all of the joints.
Put the results through some shake to determine whether or not the joints are, in fact, hard and sturdy. If the pipes have not been rotated or twisted, do not cement them; otherwise, the construction will turn distorted and entirely out of shape.
After cementing the structures, you should wait before attending to them again. The drying and hardening of the cement is the objective of this process step.
Putting the object in the water will be the last step in this activity. Make any necessary adjustments to ensure firmness, strength, and life.
Step VIII: Put on the Net and the Noodles
Putting on the net and the noodles will bring the installation process to a successful conclusion. To get smoother final results, matching the loops with the corners is required. For instance, if you are using a net with 12 loops and four goals, you need to be sure you fix one loop in each corner.
Then, proceed to link the two together in the centre to form a T-joint. The finished product ought to have a solid and natural appearance.
Connect the merger to the remainder of the net using zip ties so that the joints and results will be more stable. You should carry out these steps so that the zip ties will be hidden from view after the activity is through.
Note that you must first slide the noodles over the pipes and then use the zip ties to secure them if you do not want them to get dislodged sometimes.
Step VIII: Test the System and Have Fun
You are nearly ready to go out at this point. However, before you go, you are required to do a test on the system. Give it a little shake and pay attention to how it responds or acts after you do so.
At this point, you should make any more necessary modifications, and you should not call it a day until you are very certain that the system is spiked and spun. You are free to enjoy yourself at this point!
Conclusion
One thing jumps out clearly in light of the previous explanations we have supplied. Because the whole activity is detailed, and as a result, it requires an excessive amount of attention from you.
Given this information, you should never attempt the Dye floating basketball hoops instructions above hastily or recklessly. Instead, you should make sure that you have thoroughly studied the small print and have done some practice before beginning the installation process.


![How to Stabilize Your Basketball Goal? [Feature in 2023]](https://bestportablehoops.com/wp-content/uploads/2022/07/How-to-Stabilize-Your-Basketball-Goal.jpg)
![How are lifetime Basketball Hoops? [Features and Suggestions]](https://bestportablehoops.com/wp-content/uploads/2022/07/How-are-lifetime-Basketball-Hoops-1.jpg)